Creating a Pipeline#
As discussed, a pipeline in this context refers to a machine learning pipeline consisting of various components, each responsible for different aspects of the machine learning process. To successfully create and connect these components to form the final pipeline, it is crucial to have a fundamental understanding of the technologies and tools involved.
Some of these technologies and tools are required to deploy the components using AI Builder tools. Key technologies include Protocol Buffers (protobuf), gRPC, and Docker.
Each component will include a gRPC server that provides functions corresponding to its specific task, such as data cleaning or model creation. Additionally, components may incorporate a web application for user interaction, although this is not mandatory. All necessary code, including server code, service implementation, and any web applications, will be containerized into a single Docker container.
To create a gRPC server, you must first write a .proto file defining the data structures and service functions. This proto file, along with the Docker container, will be uploaded to the AI Builder platform. The proto files facilitate the connection between different gRPC servers.
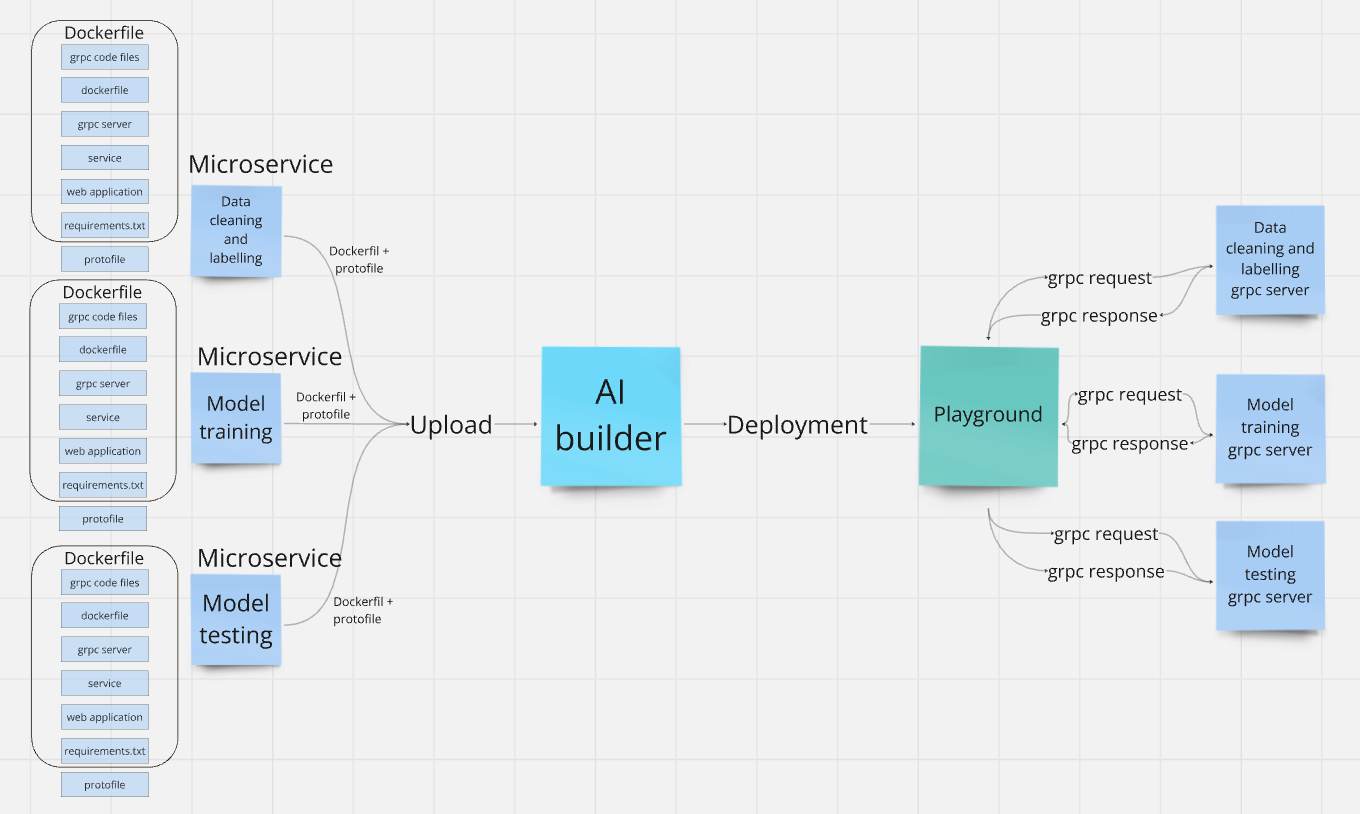
The following graph expands on the process of creating and deploying a pipeline, illustrating how each component contains specific files and how the Playground orchestrates gRPC requests and responses between servers.
The steps to create a pipeline are as follows:
1. Identify the Problem, Objectives, and Deliverables#
The initial step in creating a pipeline is to define the problem and the objectives of the pipeline. Understanding your requirements will guide you in determining the necessary components and their implementation. Clearly defining the problem and objectives helps identify the deliverables and provides a clearer understanding of the tools and technologies required for planning.
2. Create the Pipeline Outline#
Next, outline the number and function of the components required. Decide on additional technologies, such as programming languages, needed for the components. Defining each component’s inputs and outputs is critical, as these connections facilitate the pipeline’s flow. For example, the output of a data cleaning component serves as the input for a training component. Clearly defining these inputs and outputs simplifies the coding process by clarifying component expectations.
3. Implement the Components#
The third step involves implementing the components, including writing service code, testing the services, creating proto files, generating and integrating gRPC code, and potentially developing web applications. Containerize the components using Docker. The implementation process is technical and involves multiple steps, which are covered in detail in this material.
Careful testing of each component is essential before deploying the pipeline to ensure functionality and simplify debugging. Testing throughout the development process is crucial for a reliable solution, and we will cover testing procedures in detail.
4. Upload the Docker Images#
After verifying that all components function correctly, containerize the applications and upload them to Docker Hub. Define a Dockerfile for each component to facilitate this process. Uploading to Docker Hub streamlines the subsequent upload of components to the AI Builder platform.
5. Connect the Components in AI Builder#
Once components are uploaded to Docker Hub, use the AI Builder platform to upload and connect them. This process creates a deployable pipeline, which can be deployed directly from the platform or downloaded as a solution.zip file for local deployment using the Playground app.
6. Run the Pipeline#
The pipeline can be deployed and ran through the AI on Demand website.